Problem definition
A problem definition is a great starting point for aligning a team around a project or initiative. This activity gives team members an understanding of the core problem to solve, without being blinded by a shiny end-goal or pre-defined solution. Creating a problem definition at the beginning of the discovery process is a good way to kick off a successful project.
To construct a problem definition, focus on who the problem affects, how it does so, and why it’s important to solve the problem. To gather the relevant information, this play uses a technique called the "5 W's", which involves answering the questions below.
- What is the problem?
- Who is affected by the problem?
- Where does this problem occur?
- When does the problem occur?
- Why does the problem occur? Why is the problem important?
During your project, you can return to your problem statement and add to it or refine it, when more insights are uncovered. It’s like an iterative north star for your project! It will help guide and align your team and stakeholders throughout the project journey.

Outcomes
- A focussed, confident, and aligned team.
- A clearly communicable project challenge that can be used to explain the project to stakeholders.
- A set of assumptions that can be proven / disproven during research activities.
What you need
| Remote | In-person |
|---|---|
|
|
Instructions
Gather background information
Collect any relevant data or information related to the area you want to explore. This could include user feedback, market research, industry reports, or internal data. Reviewing this information can help participants understand and define the problem better and generate more informed ideas during the workshop.
Invite your participants
Participants in this session should be made up of the project team and any subject matter experts relevant to the project. This might include a Project Manager (PM), Project Officer, Designer, Business Analyst, Communications Officer, Solution Architect, or Developer. Aim for including a range of people to form a multi-disciplinary team.
If key team members are missing from the discussion, there is a high risk of starting out with unrealistic goals and incomplete information.
Communicate the purpose and goals of the workshop to all participants beforehand. Make sure everyone understands what is expected of them. You’ll want to make sure when you send an invite for the session, that you clearly explain the goal, how long it’ll take, and why people’s participation will be beneficial. You can use the provided template to make it easy.
It’s important to give enough notice to ensure participants have free time to come along to the session. Aim to send invitations about 2 weeks in advance.
You can also include the play for people to look at ahead of time.
Calendar meeting request for problem definition
Subject:Writing a problem statement for [your project]
Meeting description:Hi [team name if sending a group invitation, or participant name if sending individual invitations]
To kick off [project name], I want to start by defining the problem as a team to ensure we solve the right problem.We will be using Miro for this workshop and you can view the template [insert miro template link here] we will be using in advance of the session.
Agenda:
Goal of the session
Overview of problem space
Problem definition activity
Problem brainstorm
Synthesise and discussion
State the problem
Wrap up
[If you have pre-work/documents attached please review the documents attached prior to the session as they will help you to brainstorm the problem]
I look forward to your contribution to the session.
Kind Regards,
[Facilitator name]
Setting up the tools
For remote teams, use the Miro template provided. Share the Miro template in advance with your team so they know what to expect in the session.
For in-person teams book a room and prepare sticky notes and markers. A whiteboard or butcher’s paper is needed for the main activities. If you are running an in-person workshop, you can draw sections that are similar to the Miro board template, where people can add their physical sticky notes. Don’t worry about how it looks or matching the Miro template, just make sure there is an area designated for each activity.
Send any relevant supporting data you have in advance to the team. This might be existing data sets, previous project reports or the project plan.
Tip
If the problem might be around your users, prepare the team by gathering and sending them as much relevant user information as possible.
1. Introduction – 10 mins
Give your team an overview of the project goals and provide context on how the project came about. Let participants know that the goal of today is to understand and define the problem, not to solve it.
The introduction slides can be viewed in the Miro template or downloaded as a pdf here.
2. Identify the problem – 45 min total
2a. What do we know / what is the problem? - 10 mins
Using sticky notes, list all the information you know about the challenge at hand and list the problems you think are connected to the challenge.
2b. Synthesise and discuss – 15 mins
Group similar themes and have a discussion around the listed problems. Which ones are the most connected to the challenge?
2c. Vote for your top problem – 5 mins
Ask the participants to vote on the most important problem by using the blue circles in the working area. They have three votes each.
2d. Decide - 15 mins
Based on the votes, agree on the top 1-2 problems, that best represents the challenge and what you know right now. Add those sticky notes into the bottom square named “Key problem”.
Tip
Nothing is set in stone; you can keep refining the problem as you work through the next activities. It is also something that will be continuously iterated on throughout the engagement.
Time for a break – 5 mins
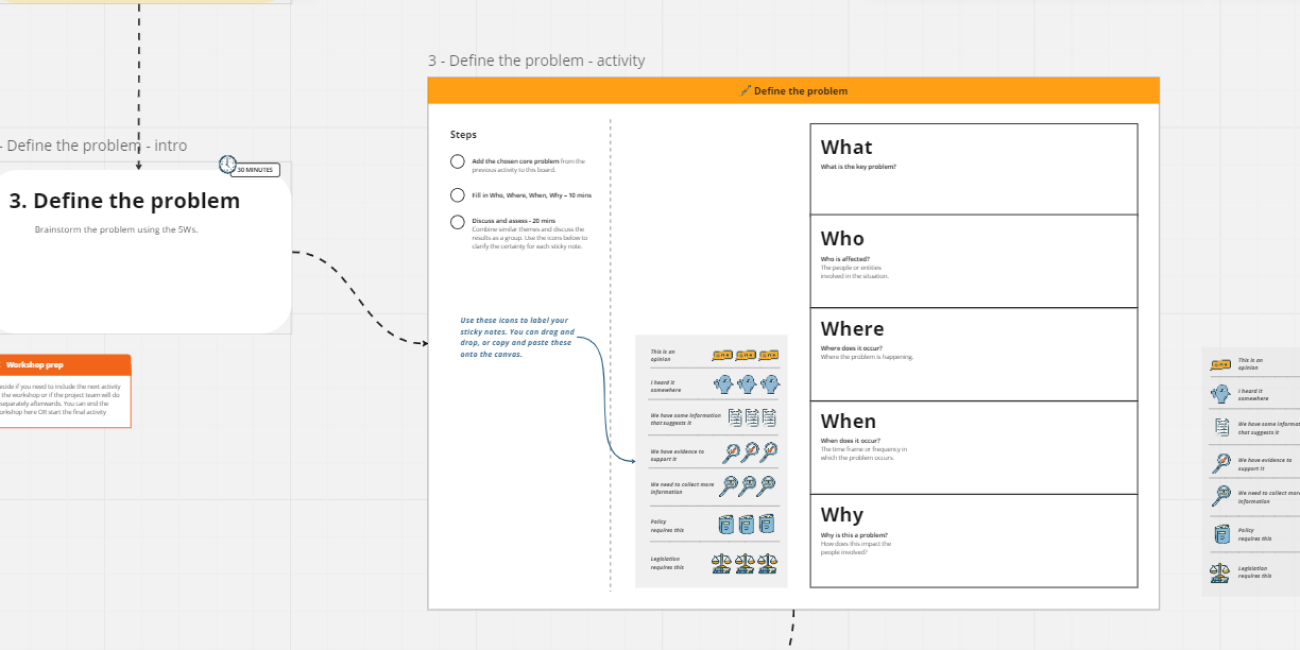
3. Problem definition canvas – 30 mins total
3a. Add the chosen core problem - 0 mins
Move the sticky note from the previous activity to this board.
3b. Fill in Who, Where, When, Why – 10 mins
Ask participants to fill in the 5Ws: who, where, when, why. You could split participants up into sections or let everyone fill in all sections at once.
3c. Discuss and assess - 20 mins
Combine similar themes and discuss the results as a group. If you are running a remote workshop, use the icons on the working area on the miro board to clarify the certainty for each sticky note (image is also shown below).
Ask the team to take a step back and think about the problem as a whole from the perspective of the people affected by it.
![]()
These drag-and-drop icons are part of the Miro template, and you can use them to help clarify some of the sticky notes that your group adds to the board.
Tip
Uncovering the true problem
If the group is struggling to answer ‘who’ or ‘why’, ask probing questions to uncover symptoms or solutions masquerading as root causes. Some example questions could be: Who is affected by this problem? Who are the stakeholders? Why is this problem important to address? Why do people behave the way they do in relation to this problem? Who are these people? What motivates them?
Tip
A good problem definition:
-Defines the underlying problem
-Surfaces the major challenges, focusing on the pain points that are most frequent, urgent, or encumbering
-Articulates the impact of the problem, including who the problem affects and how much it affects them
-Informs decisions about solutions without prescribing a specific solution
-Inspires key stakeholders to commit to solving the problem
Time for a break (if completing the next section) – 5 mins
4. Optional - Knowledge gaps and problem validation – 30 mins total
4a. Copy and paste the information – 0 mins
Copy the content from the last activity into the 5Ws section
4b. Knowledge gaps - 15 mins
Spend 5 mins to add sticky notes and discuss as a group for 10 mins.
Where are the gaps in information? What are ways we can bridge those gaps?
4c. Problem validation - 15 mins
Spend 5 mins to add sticky notes and discuss as a group for 10 mins.
What are the actions we need to take to validate the problem? Who are the people we need to engage?
5. Wrap up – 5 mins
Thank everyone for their time. Let them know what to expect next.
- Make it visible - Post your problem definition somewhere highly visible to the team - in your online space or in your physical workspace. Refer to it regularly to help the team stay focused.
- Review and iterate the problem definition canvas - As you absorb new information, regularly reconsider the problem and update as appropriate.
- Moving forward - Now that you’ve clearly defined the problem, assemble the appropriate team members together to create a plan for solving it. Running a how might we play to generate ideas is a good place to start.
Resources
See below for a collection of templates and other pages which will help you run this play. These resources are also linked in the play instructions.
Subject:
Writing a problem statement for [your project]
Meeting Description:
Hi [team name if sending a group invitation, or participant name if sending individual invitations]
To kick off [project name], I want to start by defining the problem as a team to ensure we solve the right problem.
We will be using Miro for this workshop and you can view the template [insert miro template link here] we will be using in advance of the session.
Agenda:
Goal of the session
Overview of problem space
Problem definition activity
Problem brainstorm
Synthesise and discussion
State the problem
Wrap up
[If you have pre-work/documents attached Please review the documents attached prior to the session as they will help you to brainstorm the problem]
I look forward to your contribution to the session.
Kind regards,
[Facilitator name]

